Draw A Balance Labyrinth
from KEUWLSOFT
Privacy Policy for Draw A Balance Labyrinth
Currently not available on app stores. Can be downloaded at Buy Me a Coffee (coffee optional).
Supporters on Patreon can find the app here .
Currently not available on app stores. Can be downloaded at Buy Me a Coffee (coffee optional).
Supporters on Patreon can find the app here .
Draw A Balance Labyrinth
This app allows you to design your own balance game consisting of balls, obstacles and holes. The aim is to roll the ball(s) into the designated target hole(s) by carefully balancing and tilting your device.
To design your game, you need some pens and paper. Draw your obstacles, holes and starting locations for the balls onto the paper before grabbing the image with the camera. The app will try to convert the captured image into a game.
There is also an edit mode, for when the image capture doesn't quite go right. In this mode, move holes, balls and targets about, erase or add new obstacles. Alternatively, use the edit mode to design the game instead.
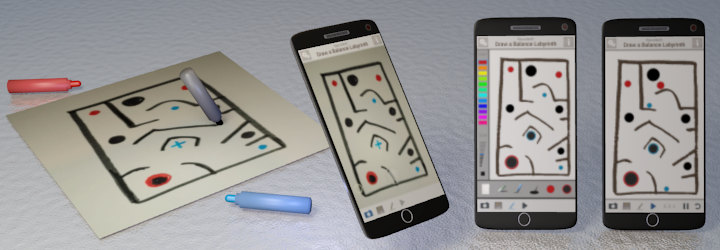
Draw, Capture, Edit and Play Stages of the App |
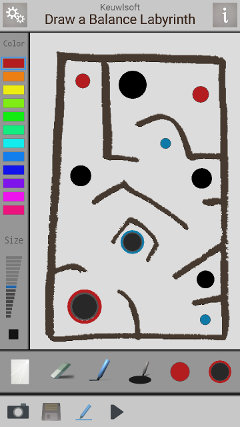
Drawing
White paper, a black pen and one or more coloured pens are required.
Use a black pen to draw obstacles. Not too thin. And not circular or else they will be recognised as holes.
Holes are drawn by black circles. Balls falling down these holes will be lost and counted as incorrectly sunk in the game.
Balls are drawn as circles of their chosen color. Use brilliant colors that stand out, rather than darker colors that might be confused with obstacles, or fainter colors that might be confused with the background.
Targets can be drawn as coloured rings with a black center as they appear in the game, or just as crosses in the required color. Balls falling down target holes of the same color will be counted as correctly sunk in the game. Target colors will be matched to the closest ball color found.
Keep it simple. Don't try to make the game to complex or have too many balls, or it will be more likely to be incorrectly interpreted or become slow when played.
Whilst pen and paper can be used to design the game, there are other possibilities, such as pencils, paints, or just colored objects placed on a white background. Experiment if you like.
Camera Mode
The camera icon at the bottom left will open the camera preview so that you can grab an image of your next game design. Line up the camera and take the image. Once grabbed, the image will automatically be analysed and the game started.
Camera LED – The Torch/Flashlight button will turn the camera LED on or off. If there is low light or shadows across your design, turn the LED on to improve game detection.
In settings, you can tweak black and color detection settings for game images grabbed with the camera. The default detection settings are with the radio buttons in the middle positions. If a game is created from the camera with non-default settings, then when saved and reloaded it may be analysed differently. Therefore, if the game is created with non default detection settings, edit the game slightly in edit mode and check it still works before saving.
Loading and Saving
Once the game image has been grabbed from the camera, or designed/modified in edit mode. It can be saved by tapping on the disk icon. Only the image is saved, so it will be re-analysed and converted into a game again each time it is loaded.
Game images can also be loaded by tapping on the disk icon, choosing 'Load Game Image' and selecting the image file of a previously created game.
Game image files are stored as png files in a keuwlsoft directory on the device. In version 1.30 or above, they are stored in the documents folder in a \keuwlsoft\labyrinth sub directory. If you draw a design in a different drawing application, you need to save it or transfer it into this directory in order for it to be loaded into the game.
Game Image from Web Link. This option grabs an image from the internet, analyses it and turns it into a balance labyrinth game. Paste or type the web address of an image in the edit box that appears to load a game image this way.
Edit Mode
In edit mode, there are 5 different tools that can be selected below the game image. These are:
Eraser – For removing obstacles, draws white onto the game image. The size of the eraser can be adjusted with the size control to the left of the game image.
Pen – For drawing obstacles that the balls will bounce off. Basically draws black onto the game image. The pen size can be adjusted with the size control to the left of the game image.
Holes – For drawing holes that you don't want the balls to fall into. Tap on this icon and drag into the game image to create a hole. Or select any existing hole and move it about the game image. To remove a hole just drag it off the game image. The hole size can be adjusted with the size control. If a hole is placed over another hole or ball or target, one or more of the items will be greyed out and ignored when the game is re-created.
Balls – Balls can be added and removed in a similar way to holes. However, balls also have a color, that is selected from the color control to the left of the game image. It is up to the user, on how many colors to use in their game. For each color used, there should be at least one target of the same color which is larger than the largest ball of the color in order that the game can be competed.
Targets – Holes that you want the same color balls to fall into. Create and move targets around as with the balls.
In addition to these controls, there is also a white rectangle icon will will create a new blank game when selected.
Edit Mode |
Play Mode
The play mode is selected with the play button, but will also be started whenever a new game image is taken or loaded. In the bottom right of the screen in play mode are pause and restart buttons along with the elapsed time shown for the current game.
The objective of the game can differ, but in general, the idea is to roll all the balls into target holes of the same color without any balls falling into holes not of its own color. How many balls, holes, targets and obstacles depends on the design of the game image.
When a game is completed, the number of balls correctly sunk and the elapsed time is shown. If all the balls are sunk into the correct color holes, then 'Game Complete' will be shown. Otherwise 'Game Over' will be shown. The best score with the current game is also shown. Best scores are reset every time a new game image is captured, edited or loaded. The best scores for the current game image are only retained after the app is closed if the 'Load previous game when app starts' setting is selected.
For Games Masters: Each game image will have a unique proof of completion code shown when that game is completed successfully. This code could therefore be used as proof that someone completed your game design and perhaps used to unlock another of your challenges. Editing the game once it is loaded will change the proof of completion code. Note that small differences in gameplay will occur from device to device due to variation in screen size and speed. Note also, that games created with the camera using changed detection settings will not have a completion code until after the game has been edited or saved and reloaded.
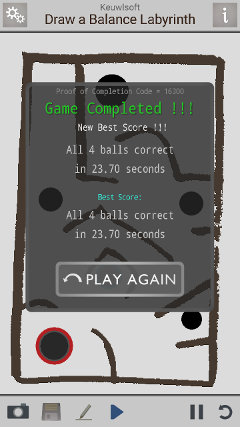
Game Completed Screenshot |
Settings
These settings are accessed with the cogs button at the top left of the screen.
Load previous game when app starts – Automatically loads and runs the game that was played the previous time the app was run. Otherwise the app will start in camera mode ready to capture a new game image.
Camera Image Analysis – Black Detection. To detect more black in the image (e.g. your black pen was a little blueish, or the black ink is not as dark as expected), move the detection setting towards the more end of the radio buttons. If too much black is detected, select a lower detection setting.
Camera Image Analysis – Color Detection. Tweaks the color detection algorithm, to be less sensitive to colors (i.e. they have to be more brilliant to stand out. For example. because you are getting extra unwanted balls or targets, perhaps because the white background wasn't really that white), or more sensitive to color and detect slighter shades of color in the image. Since separating the background and item color are determined from this algorithm, it is suggested to try changing the settings in both directions to see what works best.
Note that the detection tweaks apply to images grabbed from the camera only. The default detection settings (radio buttons in the middle positions) are always applied to images loaded via the disk button. To prevent a game created with different detection settings being analysed differently when loaded, edit the game slightly in edit mode and check it still works before saving.
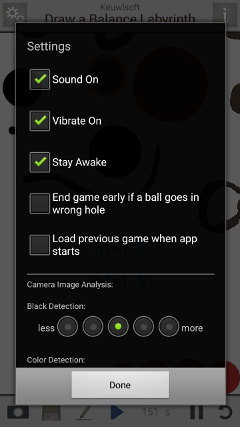
Settings |