Gauss Meter
from KEUWLSOFT
Can be downloaded at Buy Me a Coffee (coffee optional).
Supporters on Patreon can find the app here .

Summary
This app uses the magnetic field sensor on your device to measure magnetic flux density (B) in Gauss or Tesla. FOR INDICATION ONLY.
Results depend on your device and its hardware. Your device must have a Magnetic Field Sensor on your device for this app to function.
Features include:
• Analogue dial to show current reading.
• Averaging.
• Maximum and minimum values.
• Gauss or Tesla units.
• 4 time constant options. 3 Refresh speeds.
• Compass
• Ferrous metal detector – sound frequency will change with gauss level.
• Autoscale or manual (pinch & pan) Y-Axis.
• Calibrate option – If you have a calibrated gauss meter or known magnetic source, you can use this option to calibrate the meter. (However app is still for Indication Only).
Rolling graph | 
Compass |
Settings |
Using the App
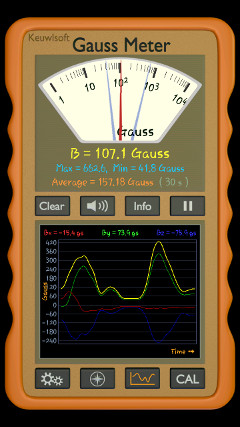
Once loaded the app will immediately start showing the magnetic flux density value in the dial, start averaging and reset the maximum
and minium values. The dial will show the current value and auto-rotate as necessary. The minimum and maximum values will be shown by blue needles
if they are within the range of the dial. Below the dial, the current, minimum, maximum and averaged values are shown. The time in which the averaging has taken place is also shown beside
the averaged value.
Below the dial are 4 buttons:
Clear - This clears the minimum, maximum and averaging values.
Speaker - This turns on a sound whose output frequency is related to the current magnetic flux density level. If you move the device around over a hidden magnetised object
you should be able to locate it by listening to the changes in tone (similar to a metal detector).
Info - This brings up a help screen with a brief explanation, a link back to this web page & other relevant info.
Pause - This pauses the measurement. Press again to unpause.
Below the first 4 buttons is a digital display whose content will vary depending on the bottom four buttons:
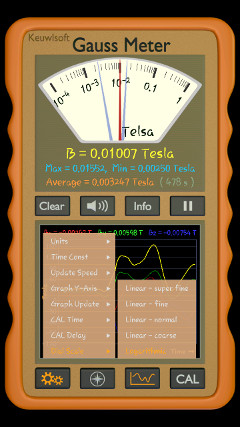
Settings - This opens up a settings menu from which some options can be changed.
Compass - This puts a compass into the second display with the red needle pointing to magnetic north.
Graph - A time series graph of the magnetic flux density magnitude and values in all 3 axis. There are 3 speed options for the graph as selected in the settings menu.
CAL - This gives the option to calibrate against known B-fields.
If in manual y-axis mode then panning or pinching the y-axis will scale or shift the y-axis accordingly. The manual or auto-scale y-axis option is found in the settings menu.
In the settings menu, the dial can be set to have fine granularity with 1 gauss per division up to very coarse (1000 gauss per division), or set to be logarithmic.

XYZ relative to device
Compass
If placed horizontal, the compass will point to magnetic north. Magnetic north and true north differ depending on location and local deviations to the Earths magnetic field from nearby objects. In this app, the compass only provides an indication of the Earth's magnetic north direction as indicated by the red needle. The orientation or angle of the magnetic field in the plane of the device is shown top left of the compass. Top right is the inclination of the magnetic field from horizontal. The inclination of the Earths magnetic field is also dependent on location. Use with caution as the magnetic field sensor hardware quality & accuracy will vary from device to device.
Gauss, Tesla and magnetic fields
Gauss and Tesla are both units of magnetic flux density, B, and 1 Tesla = 10,000 Gauss.
Ferromagnetic materials can have high magnetic permeabilities and can become magnetised. Ferromagnetic materials can therefore influence the local magnetic field depending on type, geometry, size and so on. Thus this app can be used like a metal detector to look for ferromagnetic materials such as iron and steel. This app will not detect non magnetic metals(e.g. copper, aluminium) which typically rely on Eddy current techniques for detection.
Time Constant
The time constant can be set to 0.5 seconds, 1 second, 2 seconds or 5 seconds. For rapidly changing B-field levels a lower time constant is best. The app will average the data over the time constant weighting it with a linear fall off over the length of the time constant.
The update speed is how often a new measurement is displayed. The default is 100 ms, but it can be changed to 350 ms or 1 s if slower updates are prefered.
Calibration
To calibrate, first press the CAL button. The CAL mode lets you measure up to two calibration points for each of the 3 B-field axis and enter the actual values.
The actual value can be determined from a calibrated gauss meter or a magnetic source of known strength. One of the reference calibration points could be from placing the device in a zeroing chamber (e.g. Mu metal shield).
Any CAL values are stored on exiting and restarting the app. To clear any calibration values, tap clear CAL.
Tapping cancel exits the calibration mode. Tapping Set CAL will set the new calibration based on the data in the tables. At least one data point and corresponding actual value is required before a new calibration can be set.
Each of the axis are measured separately for calibration and are selected by Bx, By and Bz buttons above the table. Only axis with calibration points done will be updated on set CAL.
Tapping the measurement box, will cause the relevant field to be measured. The duration of the measurement can be set in the settings menu as 1s, 4s, 12s or 30s. A blue progress ring appears and counts down the measurement time.
If a delay is chosen, again in the settings menu (0s, 2s, 10s or 30s), then a red countdown will first appear and countdown until the measurement starts.
After the measurement the measured value is shown.
Tapping the enter actual box will allow you to type in the value which is measured value should have been.
Depending on the number of data points entered for each axis respectively, the calibrations will be unaltered, an offset, or a linear extrapolation, from which future B-field values will be calculated.
Calibration points should be chosen to reflect the measurement range being tested.
Finally, remember this app is FOR INDICATION ONLY. Use a calibrated gauss meter where it is required.