Configure HC-06 Demo
Change baud rate and other configuration settings on an HC-06 Bluetooth module.
About this demo
This demo shows how an Bluetooth HC-06 can be configured by sending Bluetooth AT commands to its wired side from an Arduino Uno. Keuwlsoft's Bluetooth Electronics app is used to communicate to the Arduino using a second HC-06 Bluetooth module and provide an interface to change the Bluetooth configuration settings.
HC-06 AT Commands
Before being wirelessly connected, the HC-06 can be sent AT commands via a wired connection to change some of its settings, such as it's name and baud rate.
To check that AT commands are being accepted, send 'AT' , and you should get OK back.
Example:
Sent: AT
Received: OK
To Set the Baud Rate, send the command: AT+BAUDx , where x is a number corresponding to the baud rate: 1=1200, 2=2400, 3=4800, 4=9600, 5=19200, 6=38400, 7=57600, 8=115200.
Example:
Sent: AT+BAUD2
Received: OK2400
To set the device name, Command: AT+NAMEnewname . Note that the name may take a little while to be shown updated in the app/android devices already paired to it.
Example:
Sent: AT+NAMEKEUWL
Received: OKsetname
To set the PIN, Command: AT+PINpppp , where pppp is the new pin
Example:
Sent: AT+PIN1111
Received: OKsetPIN
To obtain the version of the HC-06, send AT+VERSION
Example:
Sent: AT+VERSION
Received: OKlinvorV1.8
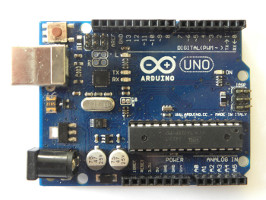
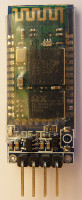
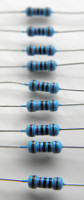
Components used
- Arduino Uno
- Two HC-06 Bluetooth Modules
- 10k and 20k Resistors
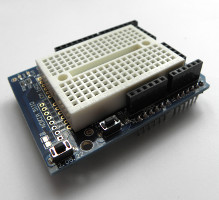
- Prototype Shield for Arduino Uno
Circuit Diagram
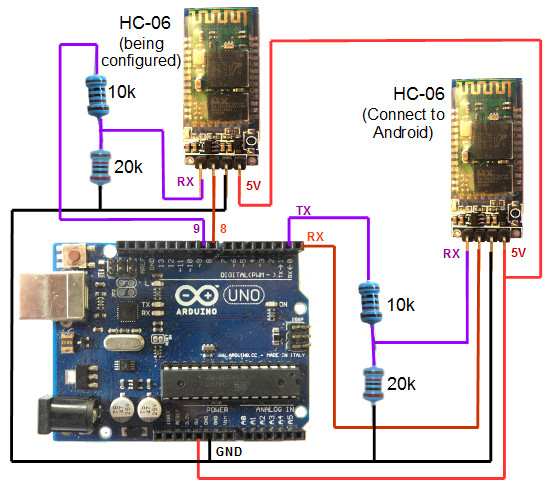
Whilst we are using an Arduino Uno for this demo, you could use a different model if you prefer. For this demo we use pins 8 and 9 for the software serial and pins 0 and 1 for the hardware serial.
The Bluetooth modules have 4 connections, GND, 5V, RX and TX. The TX pin on the Bluetooth module connects to the RX pin on the Arduino and visa versa. For serial communication, a transmit (TX) connection needs to be received by a (RX) connection.
Note that the Bluetooth module operates at 3.3V. Supplying a 5V to the Bluetooth RX pin could damage it, such that a voltage divider should be used to supply a 3.3V signal to the RX pin. This is achieved in this demo with a 20k and 10k resistor. The TX pin of the Bluetooth module does not need modification and can connect directly to the Arduino RX pin. This is because the HIGH on 3.3V logic will still be recognised as a HIGH on the 5V logic circuitry on the Arduino.
Arduino code
// Configuring HC-06 Via Bluetooth Demo
// By keuwlsoft:  www.keuwl.com  30th Sept 2015
// cc Attribution-ShareAlike

// Used with an Android device running keuwlsofts 'Bluetooth Electronics'
// app with the 'Configure HC-06 demo' panel.  Program baud rate, name and
// pin on a second HC-06 module connected to the software serial.

#include <SoftwareSerial.h> //library for software serial

//define software serial: RX on Pin 8, TX on Pin 9
SoftwareSerial softSerial(8, 9);

long baud_rates[]={1200,2400,4800,9600,19200,38400,57600,115200};
int baud_index=3;
char BluetoothData; // the data received from bluetooth serial link
boolean found_baud=false; //Flag to indicate if baud rate has been detected

void setup() {

  Serial.begin(9600); //Initialise serial for communicating to android device
}

void loop() {

 if (Serial.available()){
    BluetoothData=Serial.read(); //Get next character from bluetooth

  //Find Baud Rate
    if(BluetoothData=='F') find_baud_rate();

  //Set Baud Rate
    if(BluetoothData>48&&BluetoothData<57){ //chars '1' to '8'
      if (!found_baud) find_baud_rate();
      softSerial.print("AT+BAUD"+String(BluetoothData-48));
      delay(1500);
      if (softSerial.available()) Serial.println("Response="+softSerial.readString());
      softSerial.end();
      baud_index=BluetoothData-49;
      softSerial.begin(baud_rates[baud_index]); //Initialise software serial at new rate
    }

  //Set New Name or Custom Command
    if(BluetoothData=='N'||BluetoothData=='C'){
      String str=Serial.readString();
      if (BluetoothData=='N')str="AT+NAME"+str;
      if (!found_baud) find_baud_rate();
      softSerial.print(str);
      delay(1500);
      if (softSerial.available()) Serial.println("Response="+softSerial.readString());
    }

  //Set New Pin
    if(BluetoothData=='P'){
      int pin=Serial.parseInt();
      if (!found_baud) find_baud_rate();
      softSerial.print("AT+PIN"+ String(pin));
      delay(1500);
      if (softSerial.available()) Serial.println("Response="+softSerial.readString());
    }

 }
}

//Function to loop through the baud rates until a response is obtained
void find_baud_rate(){

  found_baud=false;
  baud_index=-1;
  while(!found_baud&&baud_index<8){
    baud_index++;
    softSerial.begin(baud_rates[baud_index]); //Initialise software serial
    Serial.println("Testing "+String(baud_rates[baud_index])+" Baud ...");
    delay(100);
    softSerial.print("AT");
    delay(1500);
    if (softSerial.available()){
      found_baud=true;
      Serial.println(softSerial.readString()+" at "+String(baud_rates[baud_index])+" Baud");
    }
    if (!found_baud) softSerial.end();
  }
  if (!found_baud) softSerial.begin(9600); //If not found, try at 9600 anyway
}
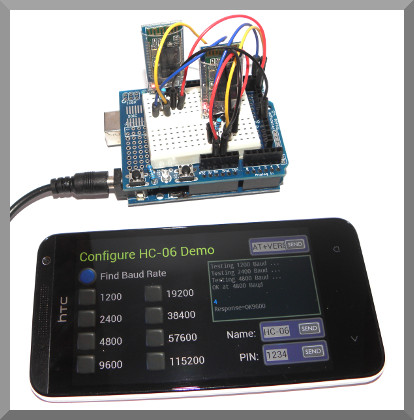
Bluetooth Electronics App
1) Run the Bluetooth Electronics app, click edit.
2) Select library and navigate to the 'Configure HC-06 Demo' and copy to panel.
3) Now connect to the Bluetooth device. Turn on power to your circuit so that the LED on the Bluetooth module starts flashing. Click connect on the main screen of the app. If not already paired, click on discover and wait for the device to appear in the list below. Select the device (e.g. HC-06) and click on pair. When requested you will need to enter a pin number, which is usually 1234 for these devices. Once paired, the device will appear on the right hand side. Select it and click on connect. Hopefully this was successful, return to the main screen.
4) The run button should be enabled now that we have connected to the Bluetooth device. Click run and test it out.
The App has 8 buttons from which the Baud rate can be set. Before sending any commands, the code will test the baud rates in sequence until it gets a response from the device to be programmed. Once the baud rate is known, it can send commands, either from the buttons, the custom command in the top right of the panel, or set the name or pin of the device with the send terminals at the bottom right of the panel.
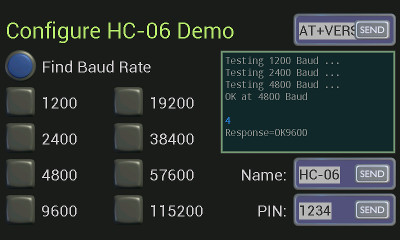
Configure HC-06 Panel.
Alternative method without an Arduino
By powering two HC-06 modules and cross linking their RX and TC pins, and then connecting wirelessly to one module, commands sent wirelessly will also be received by the second module at its wired connections. This only works if both modules are at the same BAUD rate. If you change the BAUD rate on the second module, then you can no longer send any more commands to it from the first module. You will need another way to verify the BAUD rate change was successful.
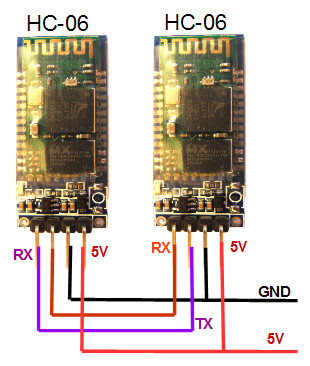
Wiring two HC-06 Bluetooth modules together