Repeater Demo
This example demonstrates software serial on the Arduino and uses it with the hardware serial to create a repeater, such that anything received on one of the serial ports is passed onto the other.
About this demo
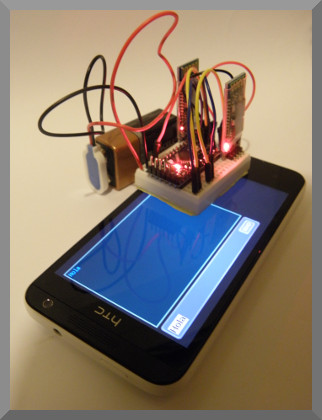
This example was written to demonstrate the send and monitor terminals within the Bluetooth Electronics app. It also introduces the software serial feature in Arduino which allows you to keep the hardware serial on pins 0 and 1 for some other function. We wanted to keep this demo small, so an Arduino mini was used.
Keuwlsoft's 'Bluetooth Electronics' app is used to communicate to the Arduino using an HC-06 Bluetooth module. Another Bluetooth module is then used to communicate to a second Android device. Alternatively, the Arduino connection to the PC can be used and the Arduino serial monitor used as the second device.
This example can be useful to extend the range of Bluetooth communication or just to check that the Arduino Bluetooth modules are receiving and transferring data as expected.
Repeater Demo Build
To show this app in action, a second device communicating to the second Bluetooth device is required. This could be the same app run on a second android device with Bluetooth capability. Alternatively if no second HC-06 module is used, the hardware serial via USB can be used with the Arduino serial monitor. Make sure baud rates match if using the Serial Monitor.
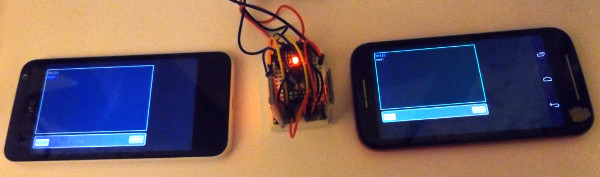
Communicating between two Android devices via the repeater.
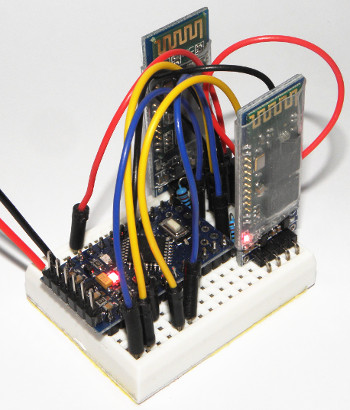
Components used
- Arduino mini
- Two HC-06 Bluetooth Modules
- 10k and 20k Resistors
- Breadboard and some Cables


Circuit Diagram
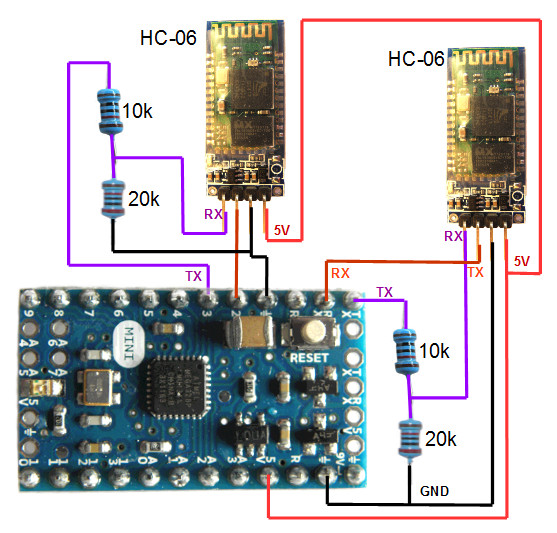
Whilst we are using an Arduino Mini for this demo, you could use a different model if you prefer. For this demo we use pins 2 and 3 for the software serial and pins 0 and 1 for the hardware serial. Note that the RX and TX positions are reversed on the mini. The corner pin is TX on the Arduino mini whereas the Arduino UNO has RX in the corner.
The Bluetooth module has 4 connections, GND, 5V, RX and TX. The TX pin on the Bluetooth module connects to the RX pin on the Arduino and visa versa. For serial communication, a transmit (TX) connection need to be received by a (RX) connection.
Note that the Bluetooth module operates at 3.3V. Supplying a 5V to the Bluetooth RX pin could damage it, such that a voltage divider should be used to supply a 3.3V signal to the RX pin. This is achieved in this demo with a 20k and 10k resistor. The TX pin of the Bluetooth module does not need modification and can connect directly to the Arduino RX pin. This is because the HIGH on 3.3V logic will still be recognised as a HIGH on the 5V logic circuitry on the Arduino.
Arduino code
#include <SoftwareSerial.h> //library for software serial

//define software serial: RX on Pin 2, TX on Pin 3
SoftwareSerial softSerial(2, 3);

void setup()
{
  Serial.begin(9600); //Initialise serial at 9600 baud
  softSerial.begin(9600); //Initialise software serial
}

void loop()
{
  //send any software serial data back out on serial link
  if (softSerial.available()) Serial.write(softSerial.read());

  //send any serial data back out on software serial link
  if (Serial.available())softSerial.write(Serial.read());
}
Programming the Arduino
Open the Arduino software, select the correct COM Port and Arduino device in the Tools menu, copy and paste the sketch and click upload. To program the device, make sure you remove pins 0 and 1 connecting to the Bluetooth module otherwise the Arduino will get confused trying to communicate to two serial devices simultaneously on the same pins. Re-connect them after programming. If using a Arduino pro mini you will need a USB to serial adapter for programming it.
When a string is received on the Bluetooth serial link with ASCII characters ranging between 32 and 126, then the display string is replaced with the new string up to a line feed or carriage return character.
Bluetooth Electronics App
1) Run the Bluetooth Electronics app, click edit.
2) Select Library and navigate to the 'Repeater demo'. Copy to panel.
3) We need to connect the bluetooth device. Turn on power to your circuit so that the LED on the Bluetooth module starts flashing. Click connect on the main screen of the app. If not already paired, click on discover and wait for the device to appear in the list below. Select the device (e.g. HC-06) and click on pair. When requested you will need to enter a pin number, which is usually 1234 for these devices. Once paired, the device will appear on the right hand side. Select it and click on connect. Hopefully this was successful, return to the main screen.
4) The run button should be enabled. Click run and test it out.