3x3 Cube Solving for Beginners
Part 1: Introduction and Cross
This guide will teach you how to solve the 3x3 cube as a beginner. You will also get familiar with some terminology used in the cubing world. This method is based on the popular CFOP method for solving the cube.
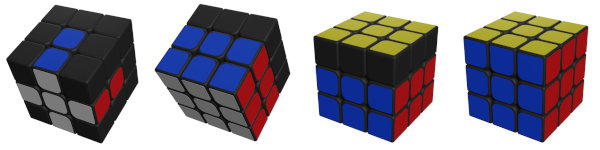
Pick up the cube, it has 8 corner pieces, 12 edge pieces and 6 center pieces.

Corner, Edge and Center Cube Pieces
The 6 center pieces do not move relative to each other (blue will always be opposite green, yellow opposite white, and red opposite orange). Therefore, the 6 center pieces are already solved.
Orient the cube with the yellow center sticker at the top, and white at the bottom. We will be referring to this orientation when we talk about the lower, middle and upper layers, and later on, all algorithms will be done assuming that yellow is at the top.
Cross
This is the first part of the CFOP cube solving method which we will solve first, The CFOP letters standing for each stage of the solve:
C - Cross
F - F2L - First Two Layers - Solved in part 2 of this guide
O - OLL - Orient Last Layer - Solved in part 3 of this guide
P - PLL - Permutate Last Layer - Solved in part 4 of this guide
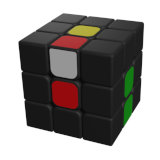
Cube after each of the CFOP stages
The cross, is simply solving the edge pieces for one side. We shall make this the bottom side of the cube and use white for the colour of the cross.
If you have some cubing ability, you might want to make the cross intuitively yourself and skip to the F2L stage.
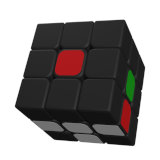
First Cross Piece
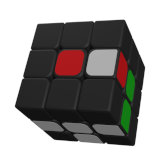
Lets take the first piece, we shall make it the edge piece with white and blue stickers on. There is only one place it needs to go, that is, between the white and blue centers.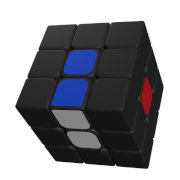
White and Blue Piece Solved
Just rotate sides of the cube until you get it into the correct position. Or, if you like click here to follow some instructions.
2nd 3rd and 4th Cross Pieces
In moving the next piece into position, we might displace the white and blue piece we have already solved, and we don't want to do that, so we will consider 5 different piece location possibilities and solve them without ruining anything already solved. The example solves are shown for the red and white edge piece.| Piece Location | How to Solve |
Piece is on the bottom layer. White sticker is on the bottom. |
Unless the piece is already solved, rotate it out to the side
and then follow the instructions for when the piece is in the middle layer.
Example |
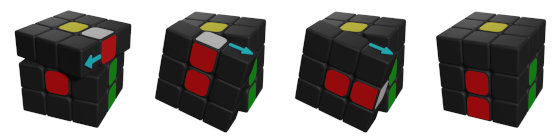
Piece is on the bottom layer. White sticker is on the side. |
First rotate the piece out of the bottom layer. Then follow the instructions for when the piece is in the middle layer.

Example |
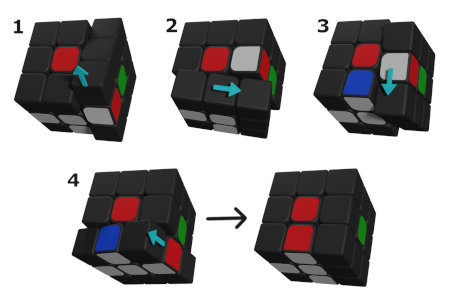
Piece is in the middle layer. |
We need to rotate the side with the coloured sticker, so that the white goes to the bottom surface. To make sure the piece
ends up in the correct place, we will likely need to rotate the bottom layer first and after making the move, rotate the bottom layer back to its original position.
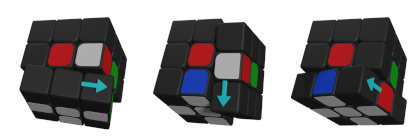
Example |
Piece on the top layer. White sticker on the top. |
Rotate the top to align the coloured sticker to the correct face, now rotate that face 180 degrees.
Example |
Piece on the top layer. White sticker on the side. |
Rotate the cube so that the colour on the piece being solved is at the front. Now rotate the top layer so that the white is on the right side of the cube.
Rotate the right side so that the coloured sticker aligns with its center. Rotate the front side so that the white sticker now also aligns with its center on the bottom.
Finally, rotate the right side to restore any solved pieces back to the bottom layer.
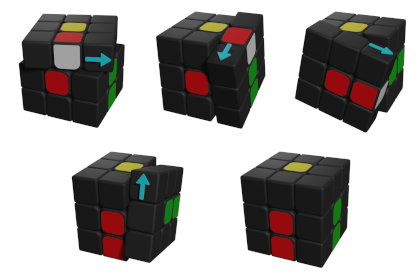
Example |
Yay, Cross solved, you should be able to solve this intuitively, without following instructions, as at this stage of the solve, the moves are still quite simple. Try making the cross on other colours to get some practice.
Now move on to part 2: First 2 Layers.