Navigating the App
When the App starts, you enter the main screen, where you will be able to see a selection of panels to choose from. Generally you will want to select or edit your panel, then use the connect screen to connect to
a device and then click run to use it.
The following diagram illustrates the flow between screens in the app. To go back to the screen you just came from, use the back button.
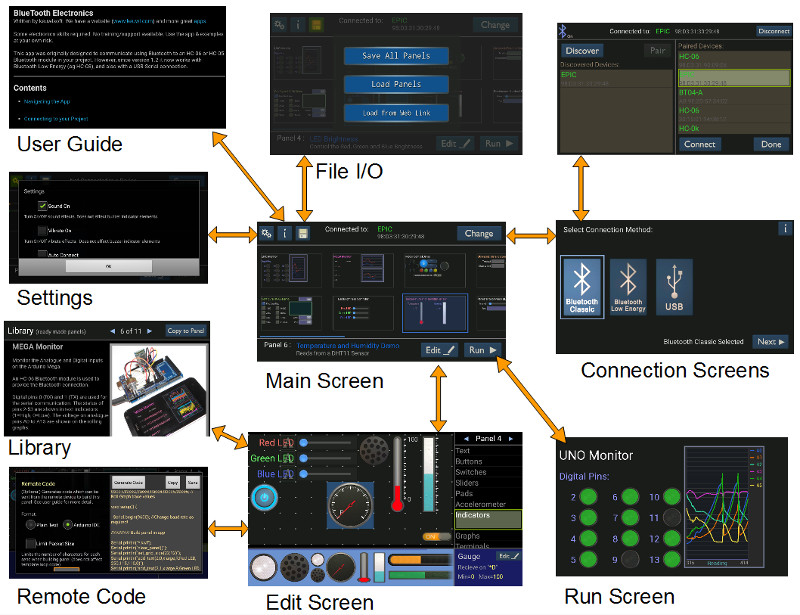
App Navigation
Main Screen
In addition to the providing access to the other screens, the central region of the main screen shows a small version of the panels. Select the panel you wish to edit or run from here. Panel information appears on the bottom left of the screen. Holding over this panel information will bring up a little more info (if available) about the panel.Connect
Tap on the Connect/Change button to enter the connection screen from which you can choose to connect to a Bluetooth device, or through a USB serial connection.Settings
The cogs on the top left of the main screen allow some main settings to be changed. All panel element properties/settings are changed in the edit screen.Info
The i button brings up more info on the app, including this user guide.File I/O
The disk button allows all the panels to be saved to file, loaded from file, or loaded from a web URL. The load from web link is another optional way to share panels avoiding the need to copy files. Since version 1.50, panel files can also be loaded by pasting the text from the contents of the file (workaround for later Android versions where files created outside this app are no longer visible to it). To load or save a single panel, use the import/export option in the edit screen. File operations are done to the documents folder in a keuwlsoft/be sub directory. In earlier app versions they were placed in a keuwlsoft directory in the root of your device.Edit Screen
This is where to go to edit the panel or create a new one. Drag and drop panel elements where you want them and edit their properties. To change panels, use the arrow buttons top right. Below the panel number is a list of the controls/indicators that can be added to the panel and other functions such as import/export, library, clear, set panel notes, adjust grid size and generate remote code. Most of these list items will bring further options to the lower part of the edit screen.Run Screen
Once connected to a Bluetooth or USB device, this button is enabled and you can enter the run mode with the selected panel.Library
From the Edit Screen, selecting Library will open up a series of ready made panels that can be copied to replace the currently selected panel. Navigate between examples with the arrows at the top of the Library screen.Remote Code
From the Edit Screen, selecting Remote code will bring up an auto code generator for your panel which can be used to generate code for the Arduino IDE.There are more features/Screens that will be covered in the relevant part of the user guide.